Group Nguyen Le
Group members
- Khai Nguyen
- Hoang Bach Nguyen
- Quynh Anh Le
Group Assignment: Toolchain & Workflow Comparison for Seeed XIAO RP2040
Objective: To demonstrate and compare three distinct development toolchains for the Seeed XIAO RP2040 microcontroller: MicroBlocks (visual, low-code), MicroPython (high-level text), and Arduino (C++).
Target Hardware: Seeed Studio XIAO RP2040
-
Microcontroller: Raspberry Pi RP2040 (Dual-core Arm Cortex-M0+)
-
Key Features: 2MB Flash, 264KB SRAM, USB-C, LED on D10.
Toolchain 1: MicroBlocks (Visual Programming)
Description
MicroBlocks is a graphical, blocks-based programming language inspired by Scratch. It runs live on the microcontroller, meaning code updates instantly without compiling or uploading. You can use the browser version, or download the application
Workflow
-
Connection: Connect the XIAO RP2040 via USB.
-
Firmware Flashing (One-Time): Download the MicroBlocks IDE. It will automatically detect the board and prompt to install the MicroBlocks virtual machine (VM) onto the RP2040 (drag-and-drop UF2 file).
-
Development: Drag and drop blocks from the library (Sensors, GPIO, Pins, etc.).
-
Execution: Click the "Start" button (or connect blocks to the Green Flag). Code runs instantly on the board. No need to compile or upload.
This is the play button, on the top right corner of the screen, next to the stop button.

Turning the RGB LED on, off
In order for the RGB lights to turn on, we take this datasheet from the microblocks XIAO RP2040 wiki
Here, RGB (RED-GREEN-BLUE) pins are 11,12,13, and they are inverted. So, we set the RGB pins to HIGH green side to turn them OFF, and LOW red side to turn them ON. This is green side, which is OFF on all 3 LEDs.
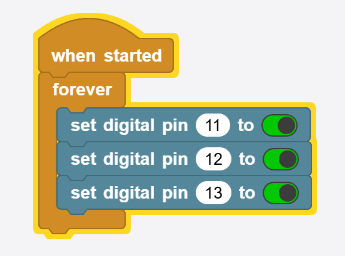
The resulting code and interation video is down here, where we can see the RGB lights turn on and off in a click of a mouse.
Toolchain 2: MicroPython (via Thonny IDE)
Description
MicroPython is a lean implementation of Python 3, designed to run on microcontrollers. It provides an interactive REPL (Read-Eval-Print Loop) for immediate feedback.
Workflow:
-
Firmware Flashing: Download the MicroPython
.uf2file for the XIAO RP2040 from the official MicroPython or Seeed Studio website. Put the board in bootloader mode (press reset twice quickly) and drag the file onto theRPI-RP2drive. Instructions -
Development Environment: Install and open Thonny IDE.
-
Configuration: Go to
Run -> Select Interpreterand choose "MicroPython (Raspberry Pi Pico)". Thonny should auto-detect the COM port. -
Development: Write Python code in the editor.
-
Execution: Press the Green "Run" button. This saves the file as
main.pyon the board and executes it. You can also type commands directly in the Shell (REPL) to control the board line-by-line.
Example Program 1: Blink Built-in LED
import machine
from time import sleep

led_pin = machine.Pin(17, machine.Pin.OUT)

led = machine.Signal(led_pin, invert=True)

while True:
    led.value(1)
    sleep(0.2)
    led.value(0)
    sleep(0.2)
Key Steps
-
IDE Features: Highlighted the use of
machine.Signal(..., invert=True)to handle the XIAO RP2040's "active-low" built-in LEDs, allowing standard1(ON) and0(OFF) logic to work.
-
Testing: The physical Red LED successfully turned on and off in a 0.2-second cycle, proving the code uploaded and executed correctly via Thonny.
Example Program 2: Serial Echo
- This program demonstrates how the XIAO RP2040 can listen to the USB connection for text input from a computer without freezing the rest of the program, and then "echo" that text back.
Workflow:
-
Setup: Ensure the XIAO RP2040 is flashed with MicroPython and connected to the Thonny IDE.
-
Execution: Paste the code into Thonny and press the Green
Runbutton.. -
Interaction: Click into the Thonny Shell (the terminal at the bottom), type a word or sentence, and press
Enter. The board will instantly reply with the same text prefixed byecho:.
Code:
import sys
import select

print("XIAO RP2040 ready — type something and press Enter.")

while True:
    # Use select to check if data is waiting in sys.stdin without pausing the loop
    readable, _, _ = select.select([sys.stdin], [], [], 0)

    if readable:
        # Read the waiting data
        line = sys.stdin.readline()
        # Send it right back out through sys.stdout
        sys.stdout.write("echo: " + line)
Key Steps
-
Hardware Communication: To communicate with the desktop, we utilized
sys.stdin(Standard Input) to listen to incoming data from the USB serial cable, andsys.stdout(Standard Output) to push responses back to the computer. -
Non-Blocking Logic: Use of
select.select(). Unlike the standardinput()function which completely freezes a program until a user types something,selectallows the main loop to keep running fast in the background while waiting for data.
-
Testing: The Thonny Shell successfully returns the typed text prefixed with "echo: ".
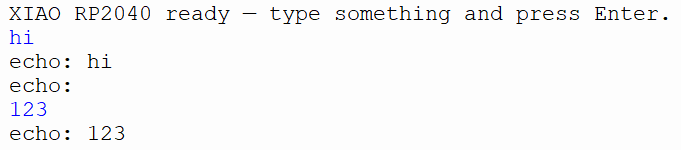
Example Program 3: Built-in WS2812 (NeoPixel) Rainbow
- This program controls the full-color, programmable WS2812 RGB LED built directly onto the top of the XIAO RP2040.
Code:
import machine
from ws2812 import WS2812

# 1. Turn on internal power to the RGB LED (Pin 11)
power = machine.Pin(11, machine.Pin.OUT)
power.value(1)

# 2. Set up the data line for the RGB LED (Pin 12, quantity: 1 LED)
led = WS2812(12, 1)

while True:
    # Run the rainbow animation
    led.rainbow_cycle(0.1)
Key Steps
-
File System: MicroPython handles external libraries by saving raw
.pyfiles directly into the microcontroller's internal file system.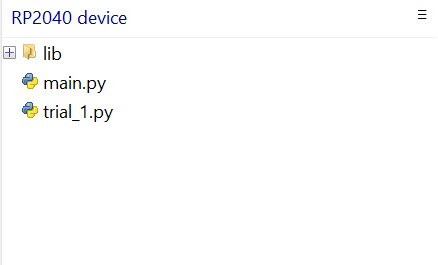
-
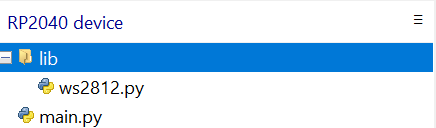
External Library: Upload file
ws2812.pyto thelibfolder as an external module.
Right click onto the file.
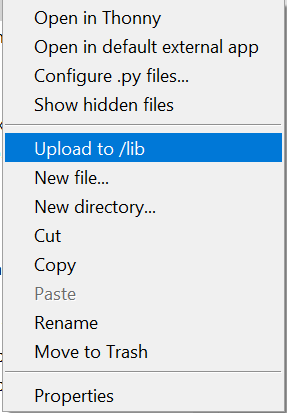
Then select Upload to /lib to upload the file to the lib folder as below:
-
Internal Wiring: Pin 11 must be set HIGH to supply physical power to the chip, and Pin 12 is used to send the data/color commands.

-
Testing: The physical WS2812 RGB LED successfully displays a continuous, shifting rainbow pattern.
Toolchain 3: Arduino (C++)
Description:
The Arduino framework is the industry standard for makers. It uses C++ and provides a simple API for controlling hardware, compiling the code directly to machine code for maximum performance.
Workflow:
-
Board Support: Open Arduino IDE. Go to
File -> Preferencesand add the following URL to the "Additional Boards Manager URLs":https://github.com/earlephilhower/arduino-pico/releases/download/global/package_rp2040_index.json.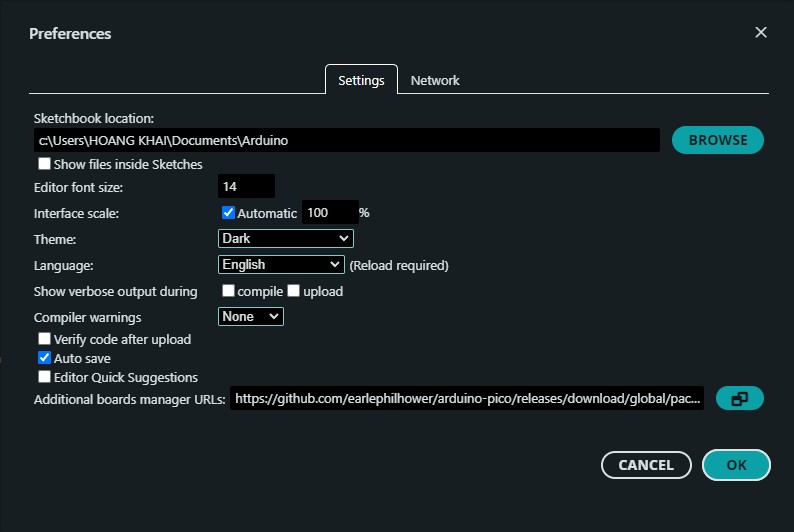
-
Install Core: Go to
Tools -> Board -> Boards Manager, search for "RP2040" and install the "Raspberry Pi Pico/RP2040" package by Earle F. Philhower.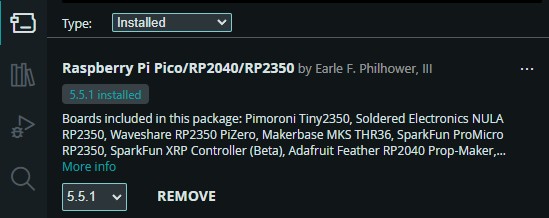
-
Select Board: Select
Tools -> Board -> RP2040 -> Seeed XIAO RP2040.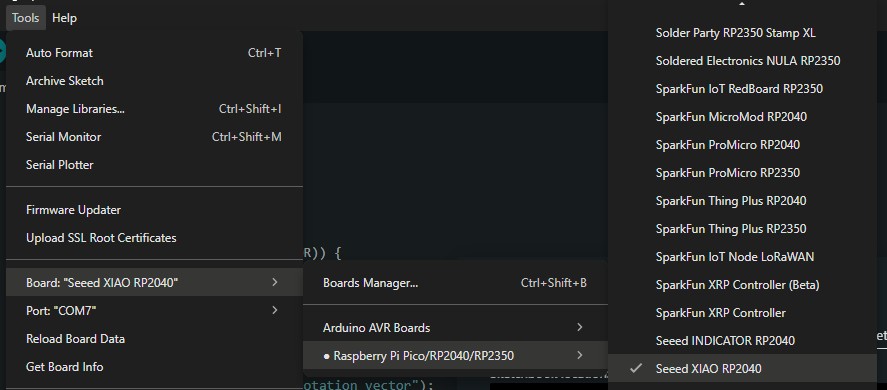
-
Development: Write C++ code.
-
Compilation & Upload: Press the Upload button. The IDE compiles the code and automatically puts the board in bootloader mode to upload the binary.
Example Program: Blink external LED on Button Press
Code:
const int buttonPin = D7;     // the number of the pushbutton pin
const int ledPin =  D6;      // the number of the LED pin

int buttonState = 0;         // variable for reading the pushbutton status

void setup() {
  // initialize the LED pin as an output:
  pinMode(ledPin, OUTPUT);
  // initialize the pushbutton pin as an input:
  pinMode(buttonPin, INPUT);
}

void loop() {
  // read the state of the pushbutton value:
  buttonState = digitalRead(buttonPin);

  // check if the pushbutton is pressed. If it is, the buttonState is HIGH:
  if (buttonState == HIGH) {
    // turn LED off:
    digitalWrite(ledPin, HIGH);
  } else {
    // turn LED on:
    digitalWrite(ledPin, LOW);
  }
}
Comparison Table
| Feature | MicroBlocks | MicroPython (Thonny) | Arduino (C++) |
|---|---|---|---|
| Abstraction Level | Very High (Visual) | High (Interpreted) | Medium-Low (Compiled) |
| Learning Curve | Very Easy (Kids/Artists) | Easy (General programming) | Moderate (C++ syntax, pointers) |
| Setup Time | Seconds (auto-flash) | Minutes (flash FW, setup IDE) | Minutes (install core) |
| Code Execution | "Live" / Interpreted | Compiled to Bytecode / REPL | Compiled to Native Binary |
| Performance | Slowest | Moderate | Fastest |
| Debugging | Visual feedback only | print() statements / REPL |
Serial.print() / LEDs |
| Best Use Case | Education, Rapid Prototyping | Quick scripting, Data analysis | Complex logic, High-speed sensors |
| Hardware Access | Limited to built-in blocks | Excellent (machine, time libs) | Full control (registers, DMA) |
| File Management | Automatic | Manual (save files to board) | Compiled binary only |
FILES
- MICROBLOCKS
- MICROPYTHON
- ARDUINO